Introduction
In the realm of culinary arts, a rolling pin is a versatile tool that bridges the gap between functionality and tradition. From delicate pastry dough to hearty pizza crusts, a well-crafted rolling pin can elevate your baking game. But why settle for store-bought when you can craft a personalized rolling pin that reflects your unique style? This beginner’s guide will take you through the steps of creating your very own DIY rolling pin, adding a touch of homemade charm to your kitchen adventures.
Experimenting with Different Woods
While hardwoods like maple, cherry, or beech are popular choices for rolling pins due to their durability and resistance to warping, don’t hesitate to explore different types of wood for a unique touch. Each wood variety imparts its own character, color, and weight to the rolling pin:
- Walnut: Known for its rich, dark tones and beautiful grain patterns, walnut adds a touch of luxury and warmth to your kitchen utensil.
- Ash: Lightweight yet strong, ash provides a comfortable grip and is less likely to split, making it ideal for extended use.
- Oak: Durable and dense, oak offers a classic look with distinctive grain patterns that can become more pronounced with use and age.
Creative Handle Alternatives
If you’re looking to further personalize your rolling pin or don’t have access to pre-made wooden handles, consider these creative alternatives:
- Leather Straps: Wrap leather strips around the ends of the dowel and secure them with brass tacks for a rustic, vintage feel.
- Ceramic Knobs: Attach handcrafted ceramic knobs for a quirky and colorful touch. Ensure they are securely fastened and safe for food contact.
- Reclaimed Wood: Use pieces of reclaimed or driftwood for handles, adding a story and eco-friendly element to your project.
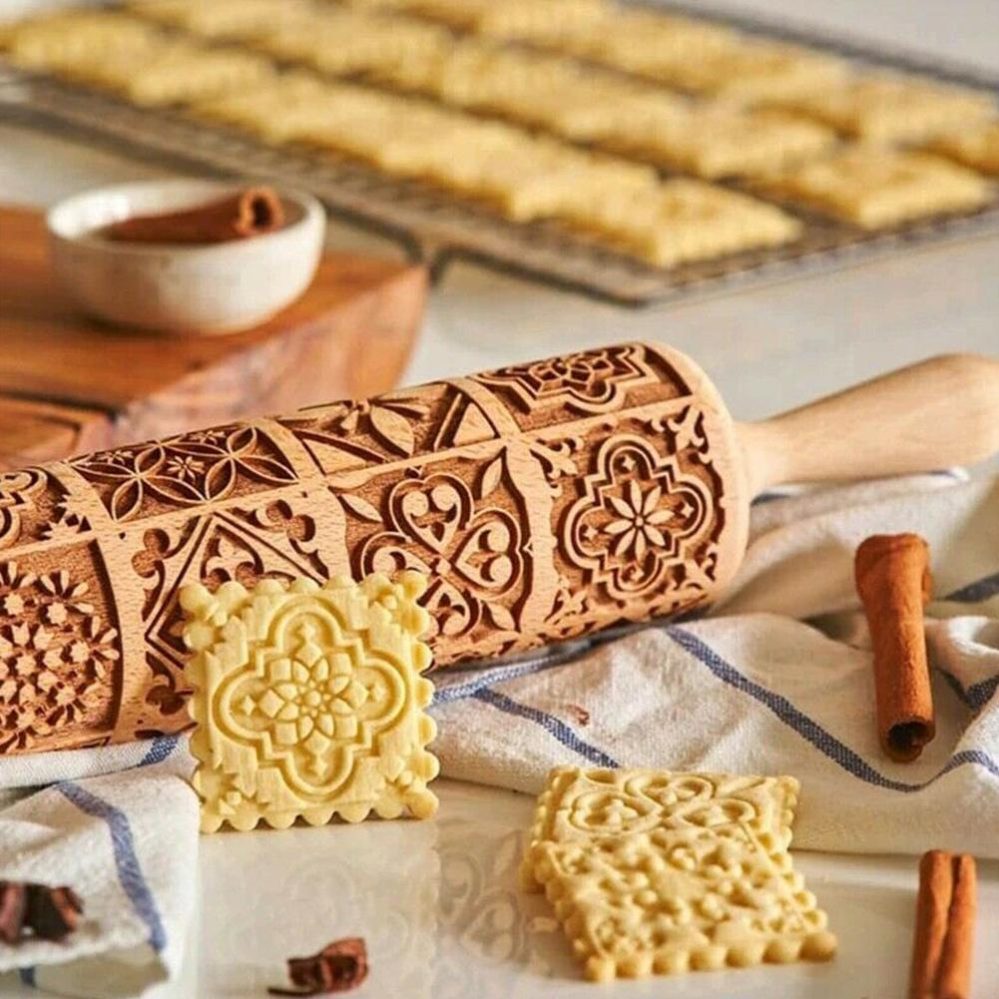
Advanced Techniques: Texturing and Carving
For those seeking an advanced challenge, incorporating texture or carving designs onto the rolling surface of the pin can open up new avenues for creative expression and baking experimentation:
- Textured Pins: Using carving tools, create grooves or patterns on the rolling surface. This can be particularly useful for making decorative patterns on pie crusts or pasta sheets.
- Carved Designs: If you have advanced woodworking skills, carve intricate designs or motifs into the rolling pin. This not only enhances its aesthetic appeal but also allows for unique imprints on your dough.
Safety First
Throughout the DIY process, prioritize safety to prevent accidents and ensure a pleasant crafting experience:
- Always wear protective gear such as goggles, gloves, and a dust mask when sanding or working with tools.
- Keep your workspace clean and organized to avoid slips or trips.
- Use clamps or a vice to stabilize the wood while cutting or drilling to prevent slippage and accidents.
- When applying finishes, ensure adequate ventilation to avoid inhaling fumes.
Sharing Your Creation
Once your DIY rolling pin is complete, it becomes a conversation starter and a point of pride in your kitchen. Share your creation on social media platforms or at local artisan markets to inspire others to embrace the joy of handmade tools. You might even consider gifting your custom rolling pins to fellow bakers, spreading the love and artistry of homemade creations.

Materials and Tools Checklist
Before diving into the creative process, gather the following materials and tools:
- Wooden Dowel: Choose a hardwood dowel, approximately 1 1/2 inches in diameter and 18 inches long, for durability and even rolling.
- Sandpaper (120 and 220 grit): Essential for smoothing out any rough edges and achieving a polished finish.
- Food-Safe Finish: Beeswax, mineral oil, or a food-safe varnish to seal the wood and make it safe for contact with food.
- Saw: For trimming the dowel to your preferred length, if necessary.
- Drill: With a bit slightly larger than the diameter of your chosen handle material.
- Wooden Balls or Handles: Optional, for a more ergonomic grip.
- Clamps: To hold the dowel securely while drilling.
- Measuring Tape and Pencil: For marking measurements.
- Safety Gear: Gloves, goggles, and a mask for protection during sanding and finishing.
Step-by-Step Instructions
Preparing the Dowel
Start by inspecting the wooden dowel for any imperfections or knots. If needed, trim it to your desired length using a saw, ensuring both ends are smooth and even.
Sanding for Smoothness
Using 120-grit sandpaper, sand the entire surface of the dowel, paying extra attention to the ends and any uneven spots. Once you’ve removed any roughness, switch to 220-grit sandpaper for a fine, silky finish. Remember to sand in the direction of the wood grain to avoid scratches.
Adding Handles (Optional)
If you choose to add handles, mark the center points where you plan to drill the holes for them. Secure the dowel with clamps to prevent it from rolling while drilling. Using the appropriately sized drill bit, carefully drill the holes halfway through the dowel from each end. Sand the inside of the holes to remove any splinters.
Attaching the Handles
Slide the wooden balls or handles onto the dowel, ensuring they fit snugly. If necessary, apply a small amount of wood glue to secure them in place, being cautious not to use too much that could seep out and affect the food-safe quality.
Applying a Food-Safe Finish
After all components are in place, apply a generous layer of your chosen food-safe finish to the rolling pin, including the handles if applicable. Allow the finish to soak in overnight, then buff with a clean cloth. Repeat the process for several layers, following the product’s instructions, to ensure a durable and protective coating.
Personalization Tips
- Engraving: Consider engraving your rolling pin with your name, initials, or a special message using a woodburning tool. This adds a personal touch and makes it a cherished item to pass down.
- Colorful Handles: Paint the wooden handles in vibrant colors or patterns using non-toxic paint to add a playful twist to your kitchen tool.
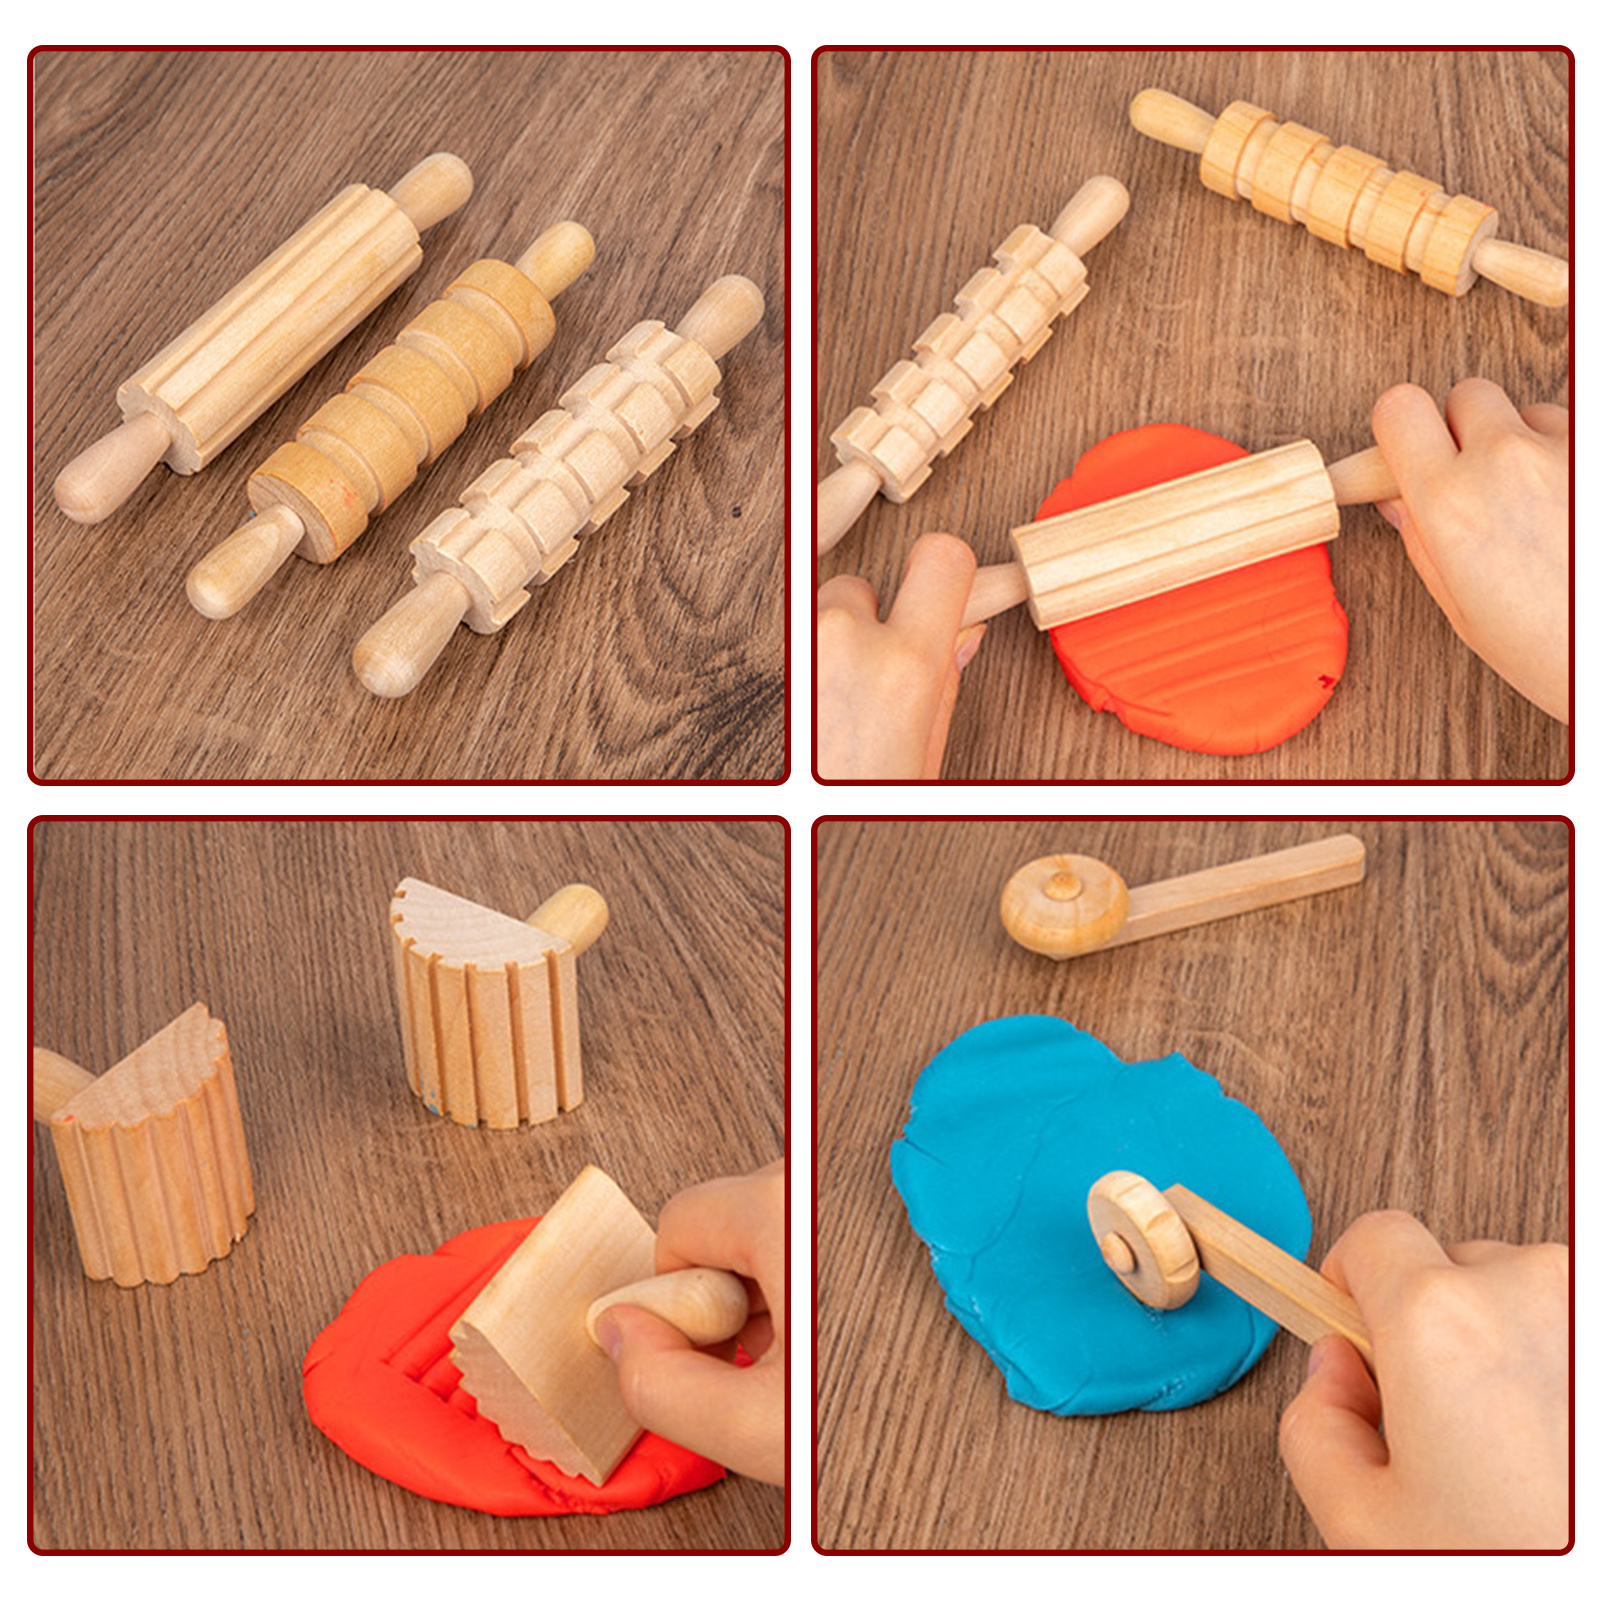
- Unique Shapes: For the more adventurous, experiment with shaping the dowel into a unique silhouette, like a twisted or tapered rolling pin, for added visual interest and potentially different textural effects in your dough.
Maintenance and Care
To keep your DIY rolling pin in top condition, always hand wash it with mild soap and water, avoiding soaking it. Dry it thoroughly with a towel and store it in a cool, dry place. Regularly inspect the finish and reapply as needed to maintain its protective qualities.
Crafting your own rolling pin is not just about practicality; it’s an opportunity to infuse your love for cooking into a tool that will become an essential part of your baking routine. With each roll, you’ll be reminded of the satisfaction and creativity involved in its creation, adding a special ingredient to every recipe – a dash of homemade magic.

Why Make Your Own Rolling Pin?
A rolling pin is a fundamental tool in baking, used to flatten and shape dough for various culinary creations such as cookies, pies, and pastries. By crafting your own rolling pin, you can:
- Personalize Design: Choose the materials, size, and style that best fit your kitchen aesthetic.
- Customize Size: Create a rolling pin that’s tailored to your hand size and comfort.
- Explore Creativity: Experiment with different wood types, designs, and finishing techniques to reflect your unique taste.
- Gift Idea: Handmade rolling pins make thoughtful and practical gifts for friends and family who enjoy baking.
Materials Needed
Before starting your DIY project, gather the following materials:
- Wood Stock: Choose a hardwood like maple, cherry, or walnut for durability and a smooth rolling surface. Ensure the wood is free of knots or imperfections that could affect your rolling pin.
- Saw: A handsaw or a table saw for cutting the wood to your desired length.
- Sandpaper: Various grits (coarse to fine) for smoothing the wood and rounding the edges.
- Wood Finish: Food-safe mineral oil, beeswax, or a combination of both for sealing and protecting the wood.
- Ruler and Pencil: For measuring and marking the wood before cutting.
- Lathe (Optional): If you plan to turn a cylindrical shape, a lathe with appropriate turning tools will be necessary.
Step-by-Step Instructions
Choose and Prepare Your Wood
- Select Your Wood: Decide on the type of hardwood you want to use. Maple is a popular choice for its hardness and smooth grain, but walnut and cherry offer rich colors and distinct grain patterns.
- Cut to Length: Measure and cut the wood to your desired length for the rolling pin. A standard length is around 18 inches, but you can adjust based on your personal preference.
Shape the Rolling Pin
- Round the Wood: If you have a lathe, mount the wood securely and use turning tools to shape it into a cylinder. Start with a rough cut and gradually refine the shape, checking the dimensions as you go. If you don’t have a lathe, you can achieve a similar shape using a plane and sandpaper.
- Smooth Edges: Use sandpaper to smooth any rough edges and ensure the entire surface is even and free from splinters.
Customize the Design (Optional)
- Add Patterns or Carvings: If you want to personalize your rolling pin further, consider carving patterns or initials into the wood using carving tools. This step allows you to add decorative elements that make your rolling pin unique.
Finish the Rolling Pin
- Apply Finish: Once you’re satisfied with the shape and design, apply a food-safe finish such as mineral oil or a mixture of mineral oil and beeswax. This finish not only enhances the wood’s natural beauty but also protects it from moisture and food particles.
- Let it Cure: Allow the finish to cure according to the manufacturer’s instructions before using the rolling pin for baking.
Enjoy Your Handcrafted Rolling Pin
- Use and Care: Your handmade rolling pin is now ready to use! Enjoy baking delicious treats with a tool that reflects your craftsmanship and creativity.
Tips for Success
- Choose Quality Wood: Opt for hardwoods known for their durability and smooth texture to ensure your rolling pin lasts for years.
- Measure Twice, Cut Once: Double-check measurements and markings before cutting to avoid mistakes.
- Safety First: Follow safety guidelines when using cutting tools and machinery to prevent accidents.
- Experiment with Designs: Don’t be afraid to experiment with different shapes, patterns, or finishes to create a rolling pin that truly speaks to your style.
Conclusion
Crafting your own DIY rolling pin is a fulfilling endeavor that combines practicality with creativity. Whether you’re making it for yourself or as a gift for someone special, the process of shaping and finishing the wood allows you to create a piece that’s not only functional but also a work of art. Embrace the opportunity to personalize every aspect of your rolling pin, from wood selection to finishing touches, and enjoy the satisfaction of using a handmade tool in your kitchen adventures. Happy baking!