Understanding the Importance of Drive Formatting
Many users purchase an external drive expecting it to work instantly. However, the reality is often different. Most external hard drives come pre-formatted for Windows operating systems. Consequently, they might not perform optimally on a Mac. You might encounter errors or read-only restrictions. Therefore, understanding how to format external hard drive mac systems support is crucial. This process prepares the storage device for communication with macOS. It essentially wipes the slate clean. It establishes a new file system that the computer can understand and write to efficiently. Without this step, transferring large files becomes impossible. You cannot save your precious memories or work documents.
Furthermore, formatting is not just about compatibility. It is also about security and performance. Old drives accumulate junk files and hidden data. Formatting removes all of this clutter. It restores the drive to its factory speed. Additionally, if you plan to sell or donate your drive, formatting is vital. It ensures your personal data is irretrievable. Many users confuse formatting with simply deleting files. However, formatting reconstructs the file architecture. It is a deeper, more comprehensive reset. Therefore, it is a fundamental skill for any Mac user.
Moreover, the file system you choose dictates how the drive behaves. Some systems are better for speed. Others are better for cross-platform compatibility. Making the wrong choice can lead to frustration later. For instance, you cannot transfer files larger than 4GB on older file systems. This limitation is a common shock for video editors. Thus, knowing the right format is as important as the process itself. This guide will explore these nuances. We will ensure you make the best decision for your specific needs.
Deciphering File System Options
When you format a drive, you must choose a file system. macOS offers several distinct options. Each has its own strengths and weaknesses. Therefore, choosing the correct one is the first critical step.
- APFS (Apple File System): This is the default file system for modern macOS versions. It is optimized for Solid State Drives (SSDs) and flash storage. APFS is incredibly fast and secure. It handles file crashing robustly. However, it is not natively readable by Windows computers. Therefore, use APFS if you only use Macs.
- Mac OS Extended (Journaled): This was the standard before APFS. It is still the best choice for mechanical hard drives (HDDs). If you have an older spinning drive, this format offers better reliability. Furthermore, it is compatible with older Macs running ancient macOS versions.
- ExFAT: This is the universal bridge. It works seamlessly with both macOS and Windows. Consequently, it is the ideal choice if you share the drive between different operating systems. It also supports very large file sizes. This makes it perfect for transferring video files between a Mac and a PC.
- MS-DOS (FAT): This is an older standard. It is compatible with almost everything. However, it has a strict 4GB file size limit. Consequently, it is rarely used today unless for specific legacy devices.
Understanding these options prevents future headaches. For example, using APFS on an old mechanical drive might cause performance issues. Conversely, using ExFAT on a Mac-only backup drive limits your ability to use Time Machine. Therefore, assess your workflow carefully. Do you need speed? Do you need compatibility? Your answer dictates the format.
Preparing for the Formatting Process
Preparation is the most overlooked stage of formatting. Many users jump straight into the Disk Utility app. However, this can lead to catastrophic data loss. Therefore, you must take specific precautions before you begin. First, check the contents of your external hard drive. If the drive is new, you are safe to proceed. However, if you have used the drive before, it likely contains files. Formatting will erase everything permanently. There is no “undo” button for this process. Consequently, you must back up your data.
Move any important files to your Mac’s internal drive or a cloud storage service. Verify that the backup was successful. Only then should you proceed to the next step. Furthermore, ensure your Mac is plugged into a power source. Formatting can take time. You do not want the battery to die halfway through the process. A power failure during formatting can corrupt the drive permanently. Additionally, close all open applications. This ensures the computer focuses its resources on the task. It prevents freezing or crashing.
Finally, check the physical connection. Ensure the USB cable is firmly seated in the port. If you are using an adapter, make sure it is high quality. A loose connection can interrupt the data stream. This causes the formatting process to fail. Once you have backed up your data and secured the hardware, you are ready. These simple steps save you from potential disaster. They ensure a smooth and successful formatting experience.
Using Disk Utility to Format External Hard Drive Mac
The primary tool for this task is Disk Utility. It is a built-in application found on every Mac. It provides a graphical interface for managing storage devices. To begin, connect your external hard drive to the Mac. Then, navigate to the “Applications” folder. Open the “Utilities” folder and double-click “Disk Utility.” Alternatively, you can use Spotlight Search. Press Command + Space and type “Disk Utility.” The application window will open.
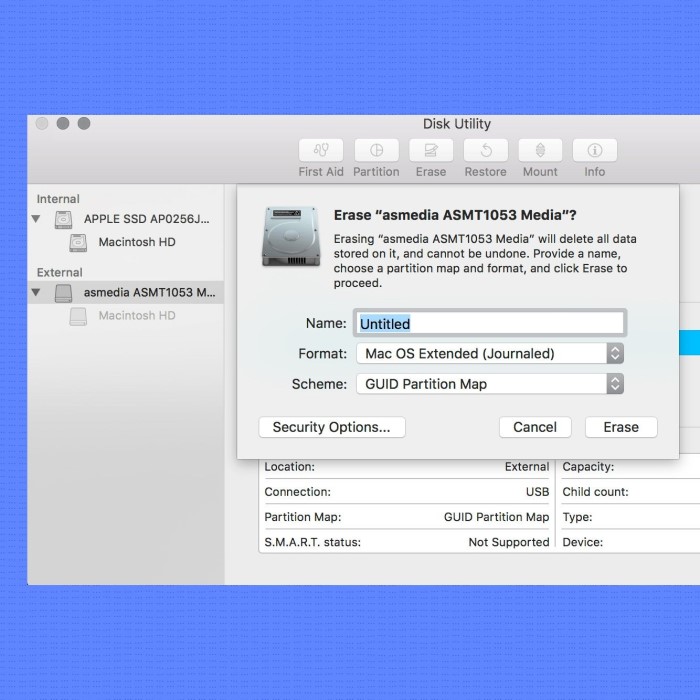
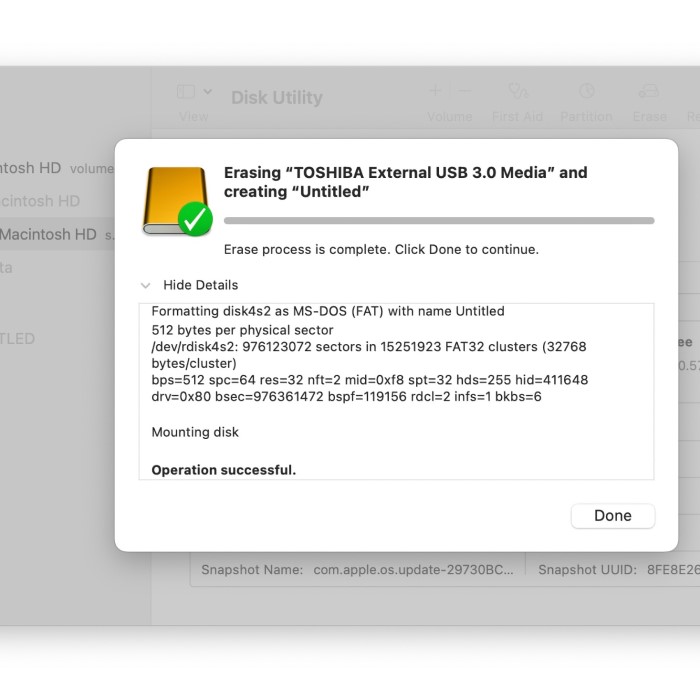
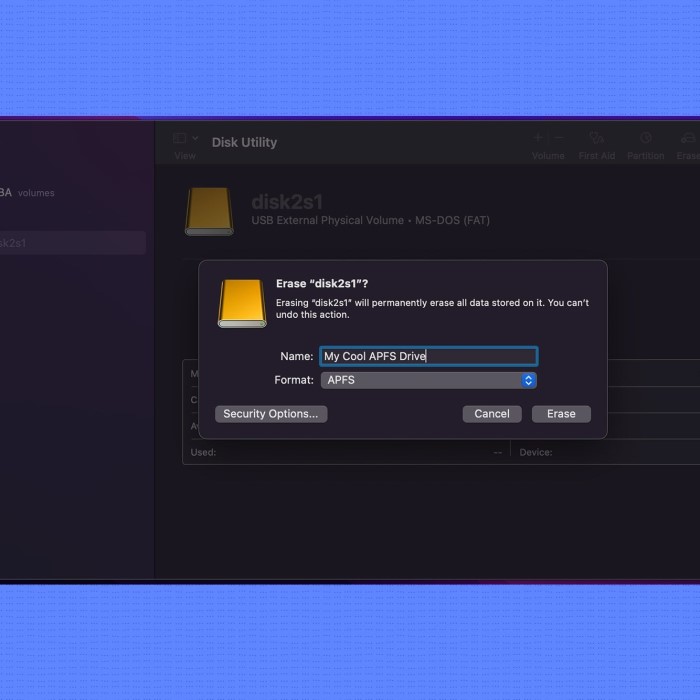
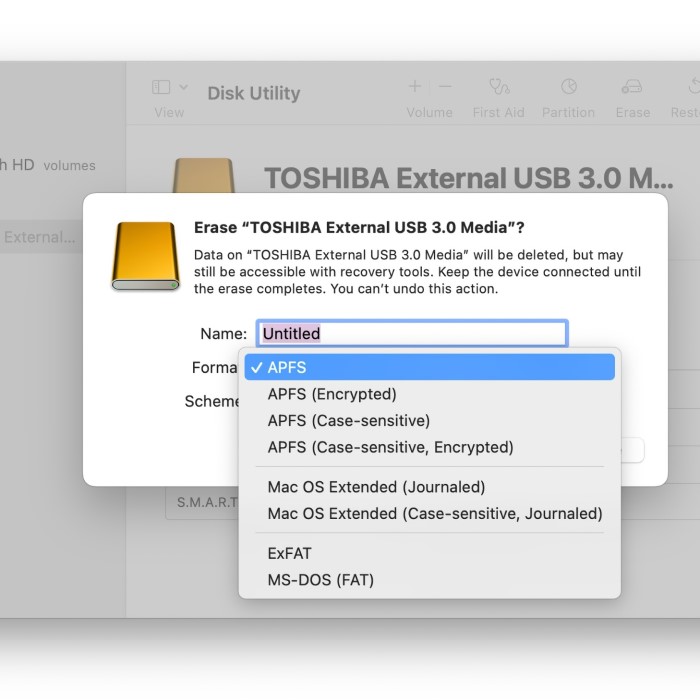
On the left-hand sidebar, you will see a list of drives. Look for your external hard drive. It might be listed under a generic name like “External” or the manufacturer’s name. Be very careful at this stage. Selecting the wrong drive will erase the wrong data. Therefore, check the drive size to confirm it is the correct one. Once selected, look at the top of the window. You will see a button labeled “Erase.” Click this button to initiate the process. A pop-up dialog box will appear. This is where you configure the settings.
In the “Name” field, give your drive a recognizable name. For example, “My Backup Drive.” Next, click the “Format” dropdown menu. Choose the file system you decided upon earlier. If you are unsure, refer to the previous section on file systems. Then, click the “Scheme” dropdown menu. If this option is not visible, click the “View” button in the top-left corner and select “Show All Devices.” Choose “GUID Partition Map” for modern drives. This is the standard for bootable and high-capacity drives. Finally, click the “Erase” button. The system will ask for confirmation. Confirm your choice. The Mac will now format external hard drive mac users have connected. Once complete, click “Done.”
Troubleshooting Common Formatting Errors
Sometimes, the process does not go as planned. Technology can be unpredictable. You might encounter error messages. One common issue is the “Erase process has failed” error. This often happens when the drive is currently in use. Therefore, ensure no files from the drive are open. You should also check if Time Machine is using the drive. If it is, you must remove it from Time Machine preferences. Another useful trick is to run “First Aid” before formatting. In Disk Utility, select the drive and click “First Aid.” This checks the drive for errors and repairs them. Once repaired, try the formatting process again.
Another frequent problem is the drive not showing up in Disk Utility at all. First, check the cable and port. Try a different USB port on your Mac. If that fails, try a different computer. If the drive appears on another computer, the issue might be with your Mac’s settings. However, if it does not appear anywhere, the drive itself might be physically damaged. Furthermore, sometimes the “Erase” button is grayed out. This usually means the drive is write-protected. Some drives have a physical switch for this. Check the exterior of the drive for a lock switch. If it is locked, unlock it and try again.
If you see a message saying “Disk Utility cannot unmount the disk,” you need to force unmount it. Open Terminal from the Utilities folder. Type the command diskutil unmountDisk force /dev/diskX (replace diskX with your drive identifier). This forces the system to release the drive. You can then return to Disk Utility to format it. These troubleshooting steps resolve the majority of formatting roadblocks. Persistence and careful diagnosis are key.
Formatting for Cross-Platform Compatibility
Many users live in a mixed technology household. You might have a Mac at home but a Windows PC at work. In this scenario, you need a drive that works on both. The native Mac formats (APFS and Mac OS Extended) are not readable by Windows. Conversely, the native Windows format (NTFS) is read-only on Mac. Therefore, you need a middle ground. The solution is ExFAT. This file system bridges the gap effectively. It allows reading and writing on both operating systems without extra software.
To format for cross-platform use, follow the Disk Utility steps mentioned earlier. When you reach the “Format” dropdown menu, select “ExFAT.” This is the critical selection. Do not select NTFS unless you only plan to read on the Mac. Furthermore, ensure you choose “Master Boot Record” (MBR) or “GUID Partition Map” for the scheme. GUID is generally preferred for drives larger than 2TB. MBR is fine for smaller drives. However, GUID is more modern and robust. Once formatted, the drive will mount on both your Mac and a Windows PC. You can drag and drop files freely between them.
However, there is a slight caveat. ExFAT is not as robust as APFS. It does not handle sudden disconnections as well. Therefore, always eject the drive properly. Do not just yank the cable out. Corruption is more likely on ExFAT if the power fails. But for transferring files between systems, it is the best option available. It supports large files, which FAT32 does not. Therefore, it is the standard for cross-platform storage.
Security and Encryption Options
Data security is a growing concern. If you lose your external drive, anyone can access your files. This is a scary thought. Fortunately, macOS allows you to encrypt the drive during the formatting process. Encryption scrambles the data. Without a password, the files are unreadable. To do this, look at the “Format” options in Disk Utility. You will see options like “APFS (Encrypted)” or “Mac OS Extended (Journaled, Encrypted).” Select one of these. The system will prompt you to create a password. Choose a strong password that you will not forget. If you forget this password, your data is lost forever. Apple cannot reset it for you.
This feature is excellent for sensitive work documents or personal backups. It provides peace of mind. Even if the drive is stolen, your privacy remains intact. However, note that encrypted drives are generally Mac-only. You cannot plug an encrypted APFS drive into a Windows computer and expect it to work. Therefore, use encryption only if you are staying within the Apple ecosystem. If you need cross-platform access, you would need third-party encryption software like VeraCrypt. This creates an encrypted container on the drive.
Furthermore, always verify the “Security Options” within the Erase dialog. If you are selling the drive, you might want a more secure erase. Click “Security Options” to reveal a slider. Moving the slider to “Most Secure” overwrites the data multiple times. This makes recovery nearly impossible. However, this process takes much longer. For a simple format, the quickest option is usually sufficient. But for sensitive data, the secure erase is worth the wait.
Frequently Asked Questions
Users often have recurring questions regarding this topic. Here are the answers to the most common queries.
How do I format my external hard drive for Mac?
The process is straightforward. Open Disk Utility via Spotlight or the Applications folder. Select your drive from the sidebar. Click the “Erase” button. Choose a format like APFS or ExFAT. Click “Erase” again to confirm. The drive will be ready for use in moments.
Is exFAT better than Mac OS Extended?
Neither is strictly “better”; they serve different purposes. ExFAT is superior for cross-platform compatibility. It works on both Mac and Windows. Mac OS Extended is better for older mechanical drives and Mac-only environments. It supports features like FileVault encryption on older hardware. Choose based on your specific usage scenario.
What is the best format for external drives on a Mac?
For most modern users, APFS is the best choice. It is fast, secure, and optimized for SSDs. However, if you use Windows computers frequently, ExFAT is the better option. It avoids the need for third-party drivers. If you use an older mechanical hard drive, Mac OS Extended is recommended for stability.
How to transfer iPhone pictures to external hard drive Mac?
First, connect the external hard drive. Open the Photos app on your Mac. Select the pictures you want to transfer. Drag and drop them directly into the external drive folder. Alternatively, use the “Export” function in the Photos app. This ensures the original files are copied safely to your new storage device.
Conclusion
Managing your digital storage is a fundamental skill. The ability to control your data ensures efficiency and security. We have explored the various methods to format external hard drive mac users rely on. From understanding file systems to troubleshooting errors, you now possess the knowledge to manage your drives effectively. Remember to always back up your data before starting. Choose the file system that matches your workflow. Whether you need the speed of APFS or the versatility of ExFAT, the power is in your hands. Proper formatting prevents data loss and ensures your drive performs at its best. Take the time to format your drives correctly today. Your future self will thank you for the organization and reliability.